Bonsai Styling 101 with David Nguy

A few weeks ago, I shared an incredible experience with some of the members of the Phoenix Bonsai Society. David Nguy, renown bonsai master and sensei, came from his home in southern California to instruct us on the styling principles of bonsai.

Everyone was to bring their personal tree for David to work on. At first I felt out of place. Almost everyone brought in a variety of juniper or other conifer while I chose a less traditional plant. I brought in a Texas Ebony (Ebenopsis Ebona), a North American native that thrives in the desert climate (More Info Here). My luck with non-native species has been horrible in the Phoenix climate. I needed something that could live comfortably through the summer. Here are some pictures of when I first brought it home:

IMG_3239 IMG_3240

As you can see, the leaves were starting to die due to change of season, but the tree was still very healthy. I chose it due to the great potential it possessed in that beautiful trunk. The trunk is the most important aspect of the individual tree itself because it is the artistic backbone of everything else. When you gaze upon a bonsai the first thing the eye is drawn to is the trunk. It needs to take the form of how a tree would naturally be growing in nature while at the same time conveying your tree’s personality.

IMG_3084

This ebony had a knotted trunk that resembled a tree growing on or between rocks.

The first thing you do before any styling is to decide where the front of the tree lies. Like many pieces of fine art, the artist intends the viewer to have a fixed perspective of the piece. The same holds true for the art of bonsai. Deciding where the front of your tree determines how the branches and pot will be arranged. You are then not mindlessly triming branches but rather methodically training them to fulfill a perspective you are trying to set in nature. David decided the front should be where the tree trunk is protruding up at the 5:00 position. This curve is soft but sturdy as the eye follows the trunk from the base to the apex.

The apex of the tree is the top most point and second most important attribute. It’s the end of your tree or where the eye will stop as it moves up the trunk. Here, after David lopped off a good number of unnecessary branches, he found the most powerful apex of the tree:

The apex’s job is to simply balance out the trunk as the tree comes to an end. There is only one apex in a bonsai, and it could be either living or dead wood. Because the trunk of this ebony is so dominant on one side, the apex must swing the opposite side of the trunk before coming back around. You can see David explaining this concept and showing how the apex will go once some wire is applied.

David told me how the branches will be arranged so it was up to me and his assistant to wire the tree. Wiring is technical work and especially challenging when your tree is covered in thorns. We spent a good half hour to 45 minutes just removing every thorn we could find because of how painful it would make the wiring process.

There are a few rules one must follow when wiring a bonsai:

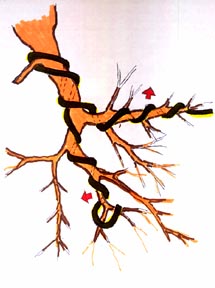
1. Depending on which direction you want to turn the branches determines which angle you should wire from. The wire must wrap around the branch where the pressure of turn is most strong. For example, a branch that needs to be bent downward must have the wire come from the top. If you are bending to the right, the wire must come from the left of the branch. Here is a little picture that briefly outlines this practice:
Wiring_II._7_sketch_A

The arrows point to the direction the branch will turn. Notice the direction the wire is coming from.


2. Never cross wires. This is where a mathematical rather than artistic mind comes into play in bonsai. To properly wire a branch using multiple wires, all the wires must fall in line with each other without any crossing. You can see this can get difficult when you have a bunch of branches to bend in different directions and need to follow the rule #1 of proper wire placement. The reason you never cross wire is because it will make your job a living hell when you need to remove the wire and simply because it looks unclean. Bonsai is all about appearance at every step of the growing process.

3. Decide how you want your branches positioned before applying wire. If you put wire on your tree and start bending it multiple times until you find the “right” spot, don’t. When you bend a branch you are breaking the microscopic fibers of the branch, similar to how weight training breaks muscle fibers. Over time the branch cells heal the damaged tissues, solidifying the tree’s shape. If you bend it here and there over and over, you are just damaging the branch more and more which can lead to death to the branch. Yes, there is a thing called “working your tree to death” and you can just imply exactly what that means.

4. When applying wire, there needs to be a spot where you anchor the one end so it doesn’t move as you wrap the wire around the branch. Anchoring the wire around the trunk should be your last resort. Remember how bonsai is all about appearance at all stages of the growing process? Well, wire on trunk is unappealing and should be avoided. The best way to anchor a wire is to secure the one end to a nearby branch, briefly passing through the trunk, and then wiring up the next branch. Here is an image of what I am talking about:

branchdown

You can see how there are only two pieces of wire but you can wire four branches with it, having both ends of the wire being the anchor for each other. David Nguy always says to “walk” the wire up a branch, never “jump” as this ensures a tight fight on the branch and avoids unwanted spaces that weaken the wire strength. He is referring to your thumbs and how the technique a true master has acquired. But of course with everything, this requires a lot of practice.

David’s assistant for the workshop and one of three apprentices he instructs in California, helped me with the wiring process. David’s initial trimming left what it seemed like an easy wiring job but it ended up taking us almost a full hour to get every branch completely wired properly. David finally came back around and worked like a true bonsai master, decisively placing each branch in relation to the front. When placing branches, you want to sculpt them in the shape of many small triangles, as is the underlying principle of asymmetric balance. Here is a little snip of him working my tree:

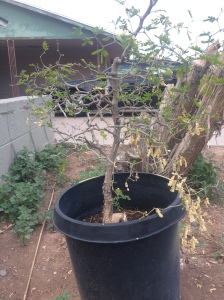
After all the work was complete, here are the results. It has come a long way since its days as nursery stock but still years from being finished. In fact, it will never be finished as it is a continuously growing piece of art. But for now, until spring, I will keep it in the large nursery pot and wait for the new leaves to sprout.
IMG_3258

Of course I had to take my picture with him!

Of course I had to take my picture with him!

The Beginner’s Guide to Bonsai and Horticulture

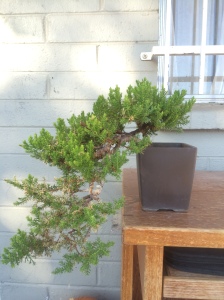
This past week, I added a new tree to my collection; a juniper procumbens nana. This particular species was the first bonsai I ever purchased and the one species I kill most often!

photo 1

My new juniper. Lots of trimming and styling to be done.

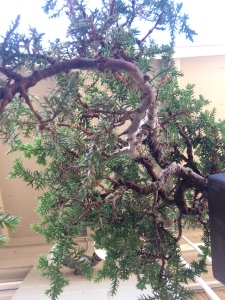
photo 2

Its underside. Check out how twisted the branches are.


But with every juniper I lose, I gain some new knowledge. Bonsai is half art and half science. You can be the best at styling a tree, but if you can’t keep the dang thing alive, you have nothing to show for. So here is a quick guide on the basic horticultural knowledge you’ll need to know when embarking on this wonderful hobby.

Never grow bonsai inside

Imagine one day you woke up, found your house in ruins, and was forced to camp outside for a few months until you found a new place. I’m guessing you wouldn’t be a whole lot happy, and if you’ve never camped a day in your life, not a whole lot healthy afterwards. This is exactly how your tree feels when you expect it to thrive and grow inside your home. Trees evolved over millions of years to adapt to the outdoor conditions, and it is not equipped for your air conditioned, dimly lit living room, no matter how cozy or well decorated it may be. Trees need the air circulation, lighting, and humidity levels not easily replicated in indoor environments. These conditions ensure the health of your tree so that it is strong against things like diseases and infestations. And besides, plants and dirt attract those pesky gnats and other bugs. So do your tree and yourself a favor, and keep them outside!

Watch your water

Now when it comes to watering, I found that this is a path you must travel alone. Yes, you can read how often you should water your trees in a book or online, but your growing medium, climate, season, pot sizes, and species are all factors in how often you should water. Deciduous trees like elms, maples, and metasequoias love water and are hard to over water. Conifers and desert varieties like junipers, ebonies, and bougainvilleas are more finicky with water and more tolerable to droughts. If you live in an arid climate like Arizona or Southern California, watering should be done more often, about once to every other day in the winter and at least once or twice a day in the summer. Humid and rainy climates like Pennsylvania and Washington during spring and autumn do not demand heavy watering like that of dry climates, and often the weather itself will keep your trees satiated. Your growing medium plays a huge role in your water regime, since inorganic material like pumice and scoria drain very quickly and require more frequent waterings than organic material like cactus soil or peat which retain a lot more moisture. Shallower pots or rock slabs like those used for forest plantings or saikeis demand more frequent watering than deep pots like those used for cascades. A good rule of thumb is to only water when the soil is medium to dry for most plants and if your leaves are wilting, you’re not watering enough, and if your leaves are yellowing, you’re watering too much. But it’s really trial and error with every plant, especially new species you’re not familiar with. Just whatever you do DO NOT leave your plants sitting in a pool of water. This will rot the roots and ultimately kill your tree. When watering, water thoroughly. This means either submerging your potted tree in a bucket of water until all the air bubbles cease to rise or giving it a generous shower with the hose, maybe about a minute or two. Let your pots drain completely.

Sunshine. Friend or Foe?

Lighting conditions for your tree is again a trial and error thing but your tree will quickly tell you if it’s liking or disliking its location. If you live in Arizona, like me, you are sure to notice that direct sun for us is a completely different thing than direct sun in the rest of the country. Desert and juniper trees like One Seed junipers and California junipers love sunshine, and will thrive in the full Arizona sun. Deciduous trees are quick to burn in the leaves when too much sun is present which is a good sign to watch out for. Know what spots in your yard are the sunniest and dimmest. Shade cloth is an excellent way to control the sunnier sides of your yard, and comes in different grades such as 30% and 50%. Sunlight also notifies your trees of the season change which tells some species to begin their dormancy period. This is extremely crucial as trees need the dormancy period in order to grow vigorously in the spring. Providing artificial light or keeping them indoors will mess up the trees natural biological clock. So always stay mindful of the amount of direct light and shade your trees are experiencing, as too much or too little will make your trees unhealthy.

Soil and Fertilizer

Soils by far are the most complicated subject when growing bonsai. Natural soil is a huge mixture off different minerals and nutrients, and replicating this in a pot can be very challenging. Not to mention soil pH which is the level of acidity or alkalinity of the soil which dictates how well your tree absorbs macro and micro nutrients. First off, soils come in two flavors: organic and inorganic. Organic soil is composed of dead living matter and by products of living things. They are your peats, barks, potting soil, wood chips, and clays. Inorganic soil is composed of minerals and by products of the unliving earth such as scoria (lava rock), pumice, chicken grit, and gravel. Akadama, which is little pieces of fired clay used as medium, can be classified as both inorganic and organic depending on how you define organic. I consider it organic but that’s just me. The benefits of organic soil is that it retains much more water, much more nutrients, and easily allows the beneficial soil fungus mycorrhiza to develop. Mycorrhiza clings to the plants roots, taking carbohyrdtaes and sugars from the plant while providing the plant with more surface area for water and root absorption. It’s a symbiotic relationship but I digress. Inorganic soil has excellent drainage while retaining water which is extremely critical for root health. I’ve found that a balance between these two materials is crucial for a healthy tree. I typically use organic material in large non-bonsai grow pots if I want a tree’s trunk to thicken or if I want the tree to grow more stems and leaves. I use inorganic in my bonsai pots because of the restricted space for root growth and need for proper drainage. Just keep in mind, the more inorganic your soil blend is, the more you will need to water and fertilize.

A few soil blends you might want to try out are:

  • 1/3 pumice, 1/3 scoria, 1/3 akadama (credit Ryan Neil)
  • 3/4 scoria, 1/4 pumice (credit Frank Harris)
  • 1/2 cactus soil, 1/4 pumice, 1/4 chicken grit (credit Joan McCarther)
  • 1/4 orchid bark, 1/2 scoria, 1/4 pumice
  • 1/4 chicken grit, 1/4 pumice, 1/4 scoria, 1/4 peat moss (more acidic blend)

Fertilizing is necessary for supplying your tree with all of the vital nutrients it needs for life. The nutrients plants eat come in two flavors: macro and micro. The macronutrients are Nitrogen. Phosphorus, and Potassium or N-P-K. The plant uses all three nutrients in all of of its biological processes but here are where each specific nutrient is used most in:

  • Nitrogen- leaf and shoot development
  • Phosphorus- root development and health
  • Potassium- Fruit and flower synthesis
4leaves

Nutrient Deficiencies. Compliments of Cornell University.

The micro nutrients are less complex molecules that the plant uses and uses in smaller quantities. Although not as vital as the macro nutrients, the micro nutrients help keep the plant functioning smoothly, much like lubricating oil in a car engine. I am not going to get into what these nutrients do individually because the amount of each that a plant uses depends on the species. They include:

  • Iron
  • Copper
  • Boron
  • Zinc
  • Manganese
  • Molybdenum
  • Chlorine

Just like soil, fertilizer is either organic or inorganic. The difference is in how quickly a plant absorbs them into their system. Inorganics are formulated in labs and include well known brands like Bayer and MiracleGro. They absorb the fastest into a plants systems because they dissolve in the water you use to water the tree and get sucked up like a sponge into the roots. The pro of inorganic is that they are a quick fix if your tree is in dire need of nutrients because they absorb so quickly. The con is that they can easily burn your trees roots which can end up killing the poor thing. If you are going to use inorganic, then I recommend using it at half strength than suggested on the box. Organic fertilizer, like fish oil and cotton seed, release slowly into the soil and take much longer for the tree to absorb and use. The con is in the speed but the pro is in the fact that you really can’t overdo it with organic fertilizer unless you plant the tree in entirely organic fertilizer. The best time to fertilzer is typically after a rain storm, but if you are in a humid climate, any time would do.

The best time to fertilize is heavy in the spring, a little less heavy in the summer, a whole lot less heavy in the autumn, and little to none in the winter. If you live in Arizona or California, fertilizing during the winter in small amounts is ideal because although the tree is semi dormant, the roots are still active.

Here are some fertilizer recipes you can use with all trees. They each have a balanced N-P-K number

  • 1/3 cotton seed meal, 1/3 blood meal, 1/3 bone meal
  • 1/3 cotton seed meal, 1/3 bone meal, 1/3 seaweed extract
  • 1/5 cotton seed meal, 1/5 blood meal, 1/5 bone meal, 1/5 fish emulsion, 1/5 rape seed meal

Well that just about covers all the basic things you need to know when starting off this amazing hobby of bonsai. For those who are more experienced, comment some of your soil and fertilizer recipes for me to post. Have a lovely day and thanks for reading!